
 admin
admin How to Build a DIY Tire Pond: Easy Backyard Garden Water Feature Guide
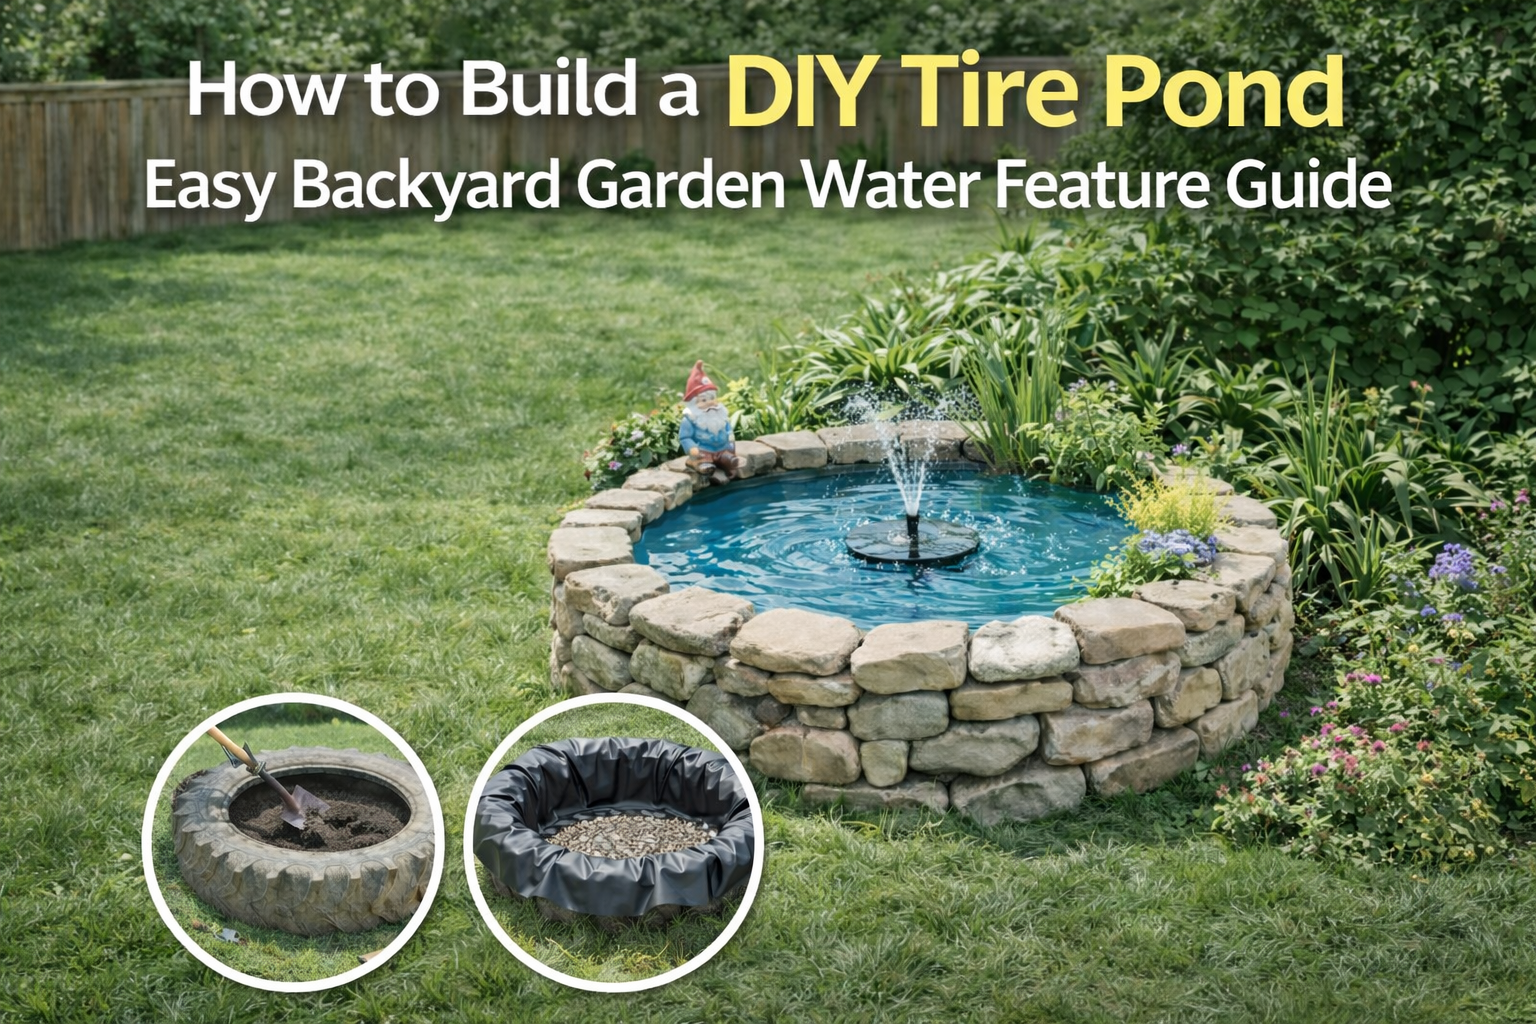
How to Turn an Old Tire Into a Stunning Backyard Pond (Step-by-Step DIY Guide)
Looking for a budget-friendly way to transform your backyard into a peaceful retreat? 🌿 Instead of throwing away that old tractor tire, why not turn it into a beautiful DIY garden pond?
This step-by-step guide will show you exactly how to create a gorgeous, low-cost water feature using a recycled tire, pond liner, and natural stone. It’s simple, creative, eco-friendly, and perfect for small backyards.
If you’ve been dreaming about adding a water feature without spending thousands of dollars, this is the project for you.
Why Build a DIY Tire Pond?
Before we dive into the steps, let’s talk about why this project is so popular.
1. Budget-Friendly
Traditional garden ponds can cost hundreds or even thousands of dollars. A recycled tire pond can be built for a fraction of that price.
2. Eco-Friendly
You’re repurposing an old tire that might otherwise end up in a landfill. It’s recycling at its best.
3. Perfect for Small Spaces
If you don’t have room for a large pond, this compact design fits beautifully in smaller yards.
4. Beginner-Friendly
No heavy construction. No complex plumbing. Just basic tools and a weekend of work.
Materials You’ll Need
Here’s everything required to build your tire pond:
- Large tractor or heavy equipment tire
- Shovel
- Level
- Sand or gravel (for base)
- Pond liner (heavy-duty, waterproof)
- Landscape fabric (optional but recommended)
- Natural stones or retaining wall blocks
- Small water pump and fountain kit
- Decorative gravel
- Aquatic plants
- Water conditioner (if adding fish)
Step-by-Step Guide to Building Your Tire Pond
Let’s break down the entire process clearly so you can follow along easily.
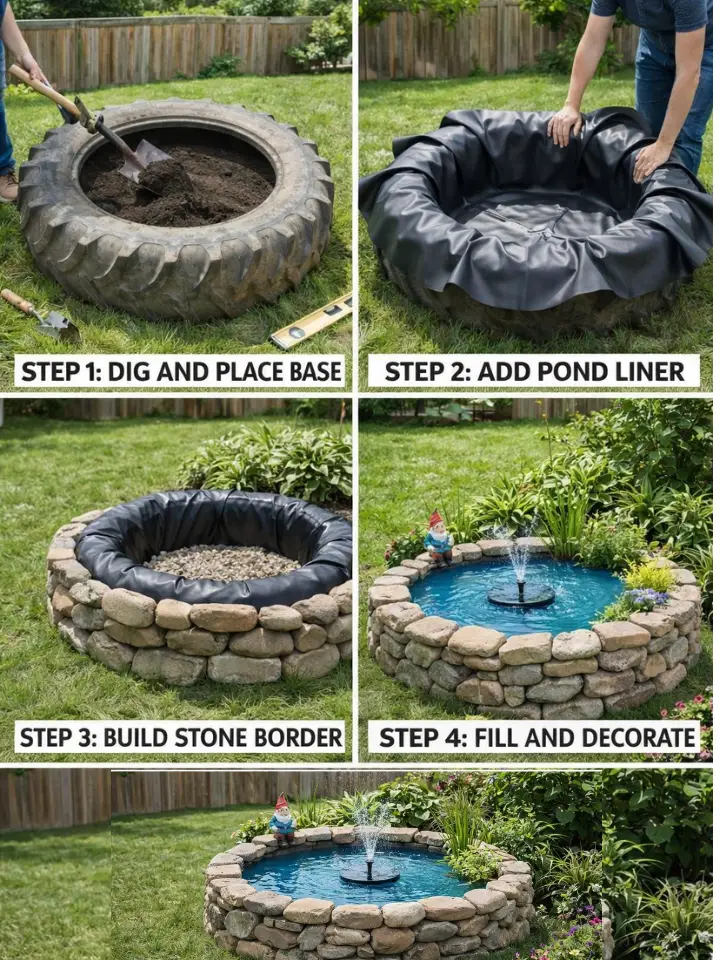
Step 1: Dig and Prepare the Base
The first image shows the tire placed in a shallow hole in the ground.
How to Do It:
- Choose a location in your yard.
- Pick a level area.
- Avoid large tree roots.
- Choose partial sunlight (4–6 hours per day).
- Dig a hole slightly wider than the tire.
- Depth should allow the tire to sit level with or slightly above ground.
- Add a base layer.
- Spread sand or gravel at the bottom.
- Use a level to ensure the surface is even.
Why this step matters:
A stable base prevents water from pooling unevenly and ensures your pond looks professional and balanced.
Step 2: Add the Pond Liner
In the second image, a black pond liner is being placed inside the tire.
How to Do It:
- Place landscape fabric inside the tire first (optional).
- This adds extra protection against punctures.
- Insert the pond liner.
- Press it gently into the center.
- Make sure it conforms to the shape of the tire.
- Leave extra liner hanging over the edge.
- Don’t trim it yet.
Important Tip:
Use a heavy-duty EPDM liner. Cheap plastic liners tear easily and won’t last long.
Why this step matters:
The liner is what makes your pond waterproof. Take your time and ensure there are no sharp objects inside the tire.
Step 3: Build the Stone Border
The third image shows stones stacked around the outside of the tire.
This is where your pond starts looking beautiful.
How to Do It:
- Stack natural stones around the outer edge.
- Cover the tire completely.
- Hide any visible rubber.
- Layer stones carefully.
- Larger stones on the bottom.
- Smaller stones toward the top.
- Fold excess liner over the top edge.
- Tuck it under the top layer of stones.
Design Tip:
Mix different stone sizes and shapes for a natural look.
Why this step matters:
The stone border transforms a simple tire into a stunning rustic pond.
Step 4: Fill and Decorate
The fourth image shows the finished pond filled with water, featuring a small fountain and plants.
Now comes the fun part!
How to Do It:
- Add decorative gravel inside the pond.
- Install a small submersible pump.
- Attach a fountain nozzle (optional but recommended).
- Fill with water slowly.
- Adjust the liner if needed.
- Add aquatic plants around the edge.
Optional:
Add a small garden statue for personality.
Why this step matters:
The fountain adds movement and prevents stagnant water. Moving water also discourages mosquitoes.
Choosing the Right Location for Your Tire Pond
Location is everything.
Here’s what to consider:
- Avoid full-day sun (causes algae growth).
- Avoid heavy tree coverage (falling leaves clog water).
- Place near a seating area to enjoy the sound of water.
- Ensure access to electricity for the pump.
Best Plants for a Small DIY Pond
Adding plants makes your pond look alive and balanced.
Great Options Include:
- Water lilies
- Dwarf papyrus
- Water lettuce
- Creeping Jenny
- Iris
Plants help:
- Filter water
- Reduce algae
- Provide habitat for wildlife
Can You Add Fish?
Yes, but with caution.
Since this is a small pond:
- Add only 1–2 small goldfish.
- Use a proper filter.
- Monitor water quality.
- Use water conditioner if using tap water.
Remember:
Overcrowding leads to poor water quality.
How to Maintain Your Tire Pond
Maintenance is simple but important.
Weekly:
- Check water level.
- Clean pump filter.
- Remove debris.
Monthly:
- Partial water change (10–20%).
- Trim plants.
Seasonally:
- Remove leaves in fall.
- Protect pump during winter (if freezing climate).
Low maintenance is one of the biggest advantages of a small pond
Common Mistakes to Avoid
Here are some mistakes beginners often make:
1. Not leveling the base
Results in uneven water line.
2. Using thin plastic liner
Leaks develop quickly.
3. Overfilling with fish
Small ponds have limited oxygen.
4. Ignoring sunlight exposure
Too much sun = algae problems.
Avoid these and your pond will thrive.
Cost Breakdown
Here’s an approximate budget:
- Old tire: Free or $20
- Pond liner: $40–$80
- Stones: $50–$150
- Pump: $30–$70
- Plants: $20–$60
Total estimated cost:
$150–$300
Compared to professional pond installation (often $2,000+), this is a huge saving.
Benefits of Adding a Backyard Pond
Beyond beauty, there are real benefits:
1. Stress Reduction
The sound of water is naturally calming.
2. Wildlife Attraction
Birds, butterflies, and beneficial insects will visit.
3. Property Appeal
Water features increase backyard charm.
4. Creative Satisfaction
There’s nothing like saying, “I built this.”
Is a Tire Pond Safe?
Yes, if built properly.
- Use heavy stones to secure edges.
- Ensure liner covers rubber.
- Supervise children.
- Keep depth manageable (under 2 feet for safety).
Creative Variations
Want to customize?
Here are some ideas:
- Paint exterior stones white for a Mediterranean look.
- Add LED underwater lights.
- Surround with flowering plants.
- Create a mini waterfall feature.
- Build multiple tire ponds connected by a small stream.
Environmental Impact
Repurposing old tires reduces waste.
Instead of contributing to landfill problems, you’re turning trash into a tranquil garden feature.
That’s sustainable DIY at its best.
Frequently Asked Questions
How long does a tire pond last?
With a quality liner, 10–20 years.
Does the rubber contaminate water?
No, if fully lined and sealed properly.
Can I build this in one day?
Yes, most projects take 6–8 hours.
Do I need a permit?
Usually no, for small decorative ponds. Check local regulations.
Final Thoughts
Transforming an old tire into a backyard pond is one of the most satisfying DIY projects you can do.
It’s:
- Affordable
- Beginner-friendly
- Eco-conscious
- Beautiful
With just a tire, some stones, a liner, and a pump, you can create a peaceful focal point that enhances your entire yard.
The gentle sound of water, the natural stone border, and the greenery surrounding it create a space that feels like a private retreat.
And the best part?
You built it yourself.
0 Comment