
 admin
admin The Best Dill Pickles Recipe: Your Guide to Crunchy, Fresh, Homemade Perfection
The Best Dill Pickles Recipe
There’s something oddly comforting about the snap of a good pickle. Maybe it brings you back to summer cookouts… maybe it reminds you of your grandmother’s pantry, filled with jars that glowed like little emerald treasures… or maybe you just love that crisp, tangy bite that store-bought jars never seem to get quite right.
Whatever your reason, making your own dill pickles gives you a taste that’s fresher, brighter, and far more satisfying than anything you’ll pull off a grocery shelf. And the truth is—you don’t need canning experience, special equipment, or hours of prep. You just need a handful of ingredients, a couple of jars, and a craving for something crunchy.
This Dill Pickles Recipe not only teaches you how to make perfect pickles—it gives you a repeatable method that you can adjust and make your own. By the end, you’ll feel like you’ve mastered a kitchen skill that people used to hand down through generations.
Let’s get into it.
Why This Dill Pickles Recipe Works
If you’ve ever tried making pickles and ended up with soft, sad cucumbers floating in cloudy brine, don’t worry—you’re about to learn why that happens and how to avoid it.
This recipe is designed to give you:
- A guaranteed crunch
- A classic flavor profile with dill, garlic, peppercorns, and a bright vinegar bite
- Fast results without canning
- A forgiving method perfect for beginners
- A customizable base you can make mild, spicy, garlicky, sweet, or tangy
You’re going to understand not just how, but why this recipe works—so you can repeat it confidently every time.
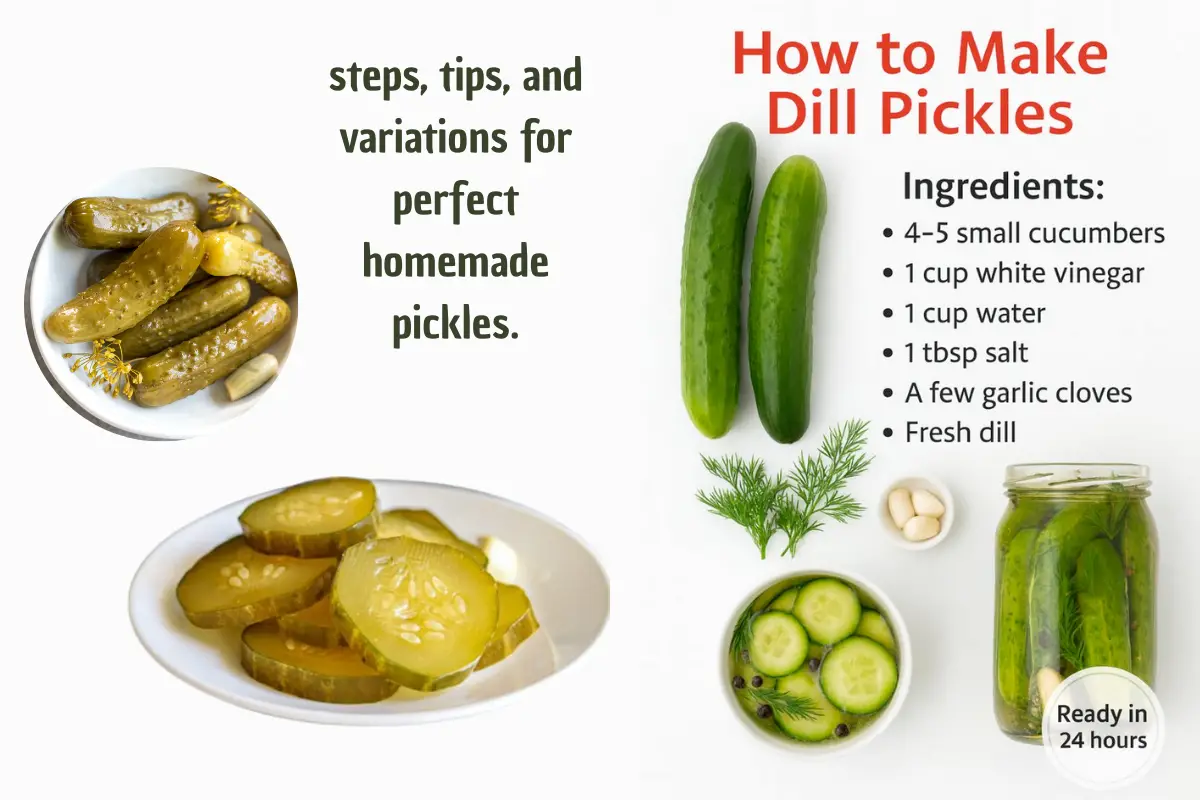
Ingredients for the Best Dill Pickles Recipe
Choosing the right ingredients is half the secret to crisp, flavorful pickles.
Dill Pickles Recipe Ingredients Table
| Ingredient | Amount | Notes |
|---|---|---|
| Fresh cucumbers | 1–2 lbs (450–900 g) | Use Kirby or mini cucumbers for the best crunch |
| Fresh dill | 6–8 sprigs | Add more for a stronger herbal flavor |
| Garlic cloves | 4–6 cloves | Lightly crushed for extra aroma |
| White vinegar | 1 cup (240 ml) | Keep it clear and sharp |
| Water | 1 cup (240 ml) | Filtered water works best |
| Salt | 1 tbsp | Use pickling or kosher salt — never iodized |
| Sugar | 1 tsp | Optional but smooths out the acid |
| Black peppercorns | 1 tsp | Adds depth |
| Red pepper flakes | ½ tsp | Optional heat |
| Mustard seeds | 1 tsp | Traditional and fragrant |
You’ll notice the ingredient list is simple. The flavor comes from balance—not complexity.
How to Make This Crunchy Dill Pickles Recipe (Step-by-Step)
This is where your kitchen transforms into your own little pickle workshop.
Step 1: Prep Your Cucumbers
This step affects your final texture more than anything else.
Here’s what you do:
- Wash the cucumbers thoroughly.
- Trim just a small piece off the blossom end (important for crunch).
- Slice them however you prefer:
- Spears for snacking
- Rounds for sandwiches
- Whole mini cucumbers for classic deli-style
A good trick: Soak cucumbers in ice water for 10–15 minutes. This wakes them up and tightens their texture.
Step 2: Pack Your Jars
Use a wide-mouth jar if possible—it makes everything easier.
Into each jar, add:
- Several sprigs of dill
- Garlic cloves
- Peppercorns
- Mustard seeds
- Red pepper flakes if you want them spicy
Then, pack in the cucumbers snugly. You want them tight, but not squeezed.
Step 3: Make the Brine
Your brine is the heart of your pickles.
You’ll combine:
- 1 cup water
- 1 cup vinegar
- Salt
- Sugar (optional)
Warm the mixture just enough to dissolve the salt, then let it cool slightly.
Pouring boiling brine directly over your cucumbers can soften them—so avoid that.
Step 4: Pour, Seal, and Chill
Once everything is ready:
- Fill your jars to the very top with brine.
- Make sure your cucumbers are fully submerged.
- Seal tightly.
- Refrigerate.
24 hours: Good
48 hours: Better
4–7 days: Peak flavor
They get more delicious each day.
Expert Tips for Perfect Dill Pickles
If you want pickles that taste like the ones from artisan delis, follow these tips:
✔ Use the right cucumbers
Thick-skinned cucumbers get soggy. Kirby or mini cucumbers stay crisp.
✔ Trim the blossom end
This side contains enzymes that soften the fruit.
✔ Avoid iodized salt
Iodine makes brine cloudy and affects consistency.
✔ Add natural tannins
Try adding:
- A piece of grape leaf
- A small black tea bag
- Cherry leaves
These help keep them firm.
✔ Keep cucumbers cold before brining
Cold = crunch.
Dill Pickles Recipe Variations You’ll Love
Once you master the base recipe, you can customize it for any flavor preference.
Spicy Dill Pickles
- Add sliced jalapeños
- Increase red pepper flakes
- Add whole dried chilies
Extra-Garlic Dill Pickles
- Double the garlic
- Add a few smashed cloves
- Let them ferment longer for deeper flavor
Sweet Dill Pickles
- Add 1–2 tablespoons of sugar
- Add thin slices of onion
- Perfect for chicken sandwiches
Kosher-Style Dill Pickles
- Add coriander seeds
- Lots of garlic
- Extra dill
- Slightly cloudy brine due to natural fermentation
Storage, Shelf Life & Safety
Proper storage ensures your pickles taste great and stay safe.
Refrigerator Dill Pickles
- Last up to 2 months
- Always keep them submerged
- Brine may get cloudier over time — this is normal
Canned Dill Pickles
If you want pantry-ready pickles:
- Use sterilized jars
- Water-bath can them for 10 minutes
- Store up to 1 year unopened
- Refrigerate after opening
Safety Notes
Throw them out if:
- Mold appears
- Brine smells off
- Pickles turn slimy
- Jar lid bulges
Food safety matters, especially with fermented foods.
Serving Ideas for Your Homemade Dill Pickles
Your pickles won’t just sit in jars—you’ll find ways to use them everywhere.
Use them:
- On burgers
- In wraps
- On charcuterie boards
- In potato salad
- In tuna salad
- On deli-style sandwiches
- In homemade tartar sauce
- As a crunchy snack
- Chopped into dips
- On grazing boards
Homemade pickles elevate everything they touch.
Troubleshooting: Common Dill Pickle Problems
If something goes wrong, here’s how to fix it next time.
Soft Pickles
- Brine was too hot
- Wrong cucumbers
- Blossom end not trimmed
- Stored at warm temperatures
Cloudy Brine
- Iodized salt used
- Natural fermentation happening
- Sugar reacting with spices
Lack of Crunch
Try:
- Ice bath
- Grape leaf
- Cooling brine
- Better cucumber variety
FAQs About This Dill Pickles Recipe
How long does this Dill Pickles Recipe take to ferment?
Around 1–7 days depending on temperature. Longer = stronger flavor.
Can I use apple cider vinegar?
Yes, it gives a fruitier twist, but changes the color slightly.
What cucumbers are best?
Kirby cucumbers or mini cucumbers deliver the firmest crunch.
Can I reuse the brine?
Not for new cucumbers—it dilutes the salt content.
You can reuse it to quick-pickle carrots or onions.
Why trim the blossom end?
It removes enzymes that soften your pickles.
Conclusion: Your Homemade Dill Pickles Recipe Awaits
Now that you understand the method, the science, and the variations, you’re ready to make the best dill pickles you’ve ever tasted. This isn’t a recipe you follow once—this is something you’ll come back to again and again, adjusting, improving, and making uniquely yours.
Homemade pickles feel like a small victory every time you open the jar.
The crunch, the aroma, the satisfaction—it’s all worth it.
So go ahead.
Grab your jars… get your cucumbers ready… and start your first batch today.
Your fridge is about to get a whole lot better.
0 Comment